Page 3 of 6
Now, we’re going to darken the areas that won’t be affected by the light that we will be putting on the sorceress’ hands. Create a new layer (Ctrl/Cmd + Shift + N) and name it “Darken 1”. We would need black paint so let’s change the brush’s color. Activate the Color Picker and input the following:
Now let’s activate the Brush tool (B) and input the following:
- Brush size: 600px
- Hardness: 0%
- Opacity: 30%
- Flow: 100%
Apply the brush on the region indicated below:
The result should be similar to this:
Next, let’s further darken these areas that wouldn’t be touched by the light. Create a new layer and name it “Darken 2”. Before you proceed, make sure that the brush’s color is still black.
Now, activate the Brush tool (B) and input the following:
- Brush size: 600px
- Hardness: 0%
- Opacity: 30%
- Flow: 100%
The result would be like this:
Create a new layer again; “Darken 3”. Use the black colored brush and then activate the Brush tool (B) then input the following values:
- Brush size: 500px
- Hardness: 0%
- Opacity: 30%
- Flow: 100%
Use the brush on the following region:
The result should be similar to the image below:
Now, let’s activate the Burn tool (O); we’re going to darken the sorceress’s pale arms because darkening it will just make it black and not darkened. When the Burn tool is activated, input the following values:
- Brush size: 500px
- Hardness: 0%
- Range: Midtones
- Exposure: 25%
The result should be similar to the image below:
When you’re done, select all the layers that you’ve created in this step and then press Ctrl/Cmd + G to group them. Name this group to “Sorceress”.
Step 4: Create the Butterfly
Now in this step, we will be adding the butterfly. To start, open “Butterfly Stock 12” by Shoofly Stock.
Activate the Polygonal Lasso tool (L) and drag a selection area around the butterfly shown on the image below:
After creating the selection, activate the Move tool (V) and drag that butterfly to our canvas. Once it’s on the canvas, rename this layer to “butterfly”. Position the butterfly as seen on the image below:
Now, let’s resize the butterfly using the Transform tool (Ctrl/Cmd + T). See image below:
After that, let’s reduce the Brightness of the butterfly; to do that, simply click on the “butterfly” layer and then go to Image > Adjustments > Brightness/Contrast. When the box opens, input the following values:
- Brightness: +5
- Contrast: 0
The result should be similar to the following:
How to Create a Magic-Yielding Sorceress Photo Manipulation - Page 4
Page 4 of 6
Step 5: Create the Magical Light
In this step, we will be adding the light coming from the sorceress’ hands. To start, make sure that you have downloaded the Sparkles brush by Tempting-Resources. To open that brush after downloading, simply extract or copy the brush (.abr file) to this destination: Adobe >Adobe Photoshop > Presets > Brushes.
Once you’ve done that, we will now open this brush pack in Photoshop. First, activate the Brush tool (B), once it’s open right click on the canvas to bring up the menu. When the menu shows up, click on the drop-down menu button located on the upper right portion of the menu. See image below:
After clicking that, a new menu would show up – click on “Load Brushes” from the contextual menu.
When the load brushes box opens, locate the file: “sparkles_by_an3czka.abr” and press OK. Now, when you activate the Brush tool (B) and right click on the canvas, you’d see a different brush pack – you’d now see the “sparkles brushes”. Now, let’s start adding the magical light. First, create a new layer (Ctrl/Cmd + Shift + N) and then name it “Magic 1”. Activate the Brush tool (B) and right click on the canvas and then choose the brush shown on the image below:
Next, we will change the brush’s color. Activate the Color Picker box and then input the following value:
Input the following values for the Brush tool (B):
- Brush size: 1600px
- Hardness: Default brush hardness
- Opacity: 100%
- Flow: 100%
Now, it’s time to paint. Follow the instructions as seen on the image below:
The result:
Next, create another layer and name it “Magic 2”. We will be utilizing the normal or default brushes and in order for us to do that, we would need to reset the brushes. First, activate the Brush tool (B) and then right click on the canvas, then click on the drop down arrow button and when the contextual menu appears, click on “Reset Brushes”. See image below:
After resetting the brushes, change the brush’s color by activating the Color Picker and using the following values:
Once you’ve done that, activate the Brush tool (B) and input the following values:
- Brush size: 800px
- Hardness: 0%
- Opacity: 50%
- Flow: 100%
Now let’s paint! See image below for more instructions:
For the next layer, input the name “Magic 3”. We will still be utilizing the default brushes on this layer.
Then activate the Color Picker and input the following color code:
Activate the Brush tool (B) and input the following settings:
- Brush size: 1600px
- Hardness: 0%
- Opacity: 25%
- Flow: 100%
The result should be similar to the following image:
On our next layer which will be named “Magic 4”, we would need to Load the CRASH_SPACE.abr brushes by KeRen-R
Once you have loaded the said brushes, we would need to change the brush’s color. Input the following on the Color Picker box.
When you’re done, activate the Brush tool (B) and input the following settings:
- Brush size: 615
- Hardness: Default
- Opacity: 100%
- Flow: 100%
Now, let’s start painting; see image below for more instructions:
The result:
Now that that’s done, let’s make it look more magical by making the sparkles glow. First, right-click on the layer: “Magic 4” and then when a contextual menu opens, click on “Blending Options”.
When the Blending Options box opens click on the “Outer Glow” tick box on the Styles section.
Next, click on the word “Outer Glow” to bring you to its settings page. Once there, input the following:
- Structure: USE DEFAULT VALUES
- Elements
- Technique: Softer
- Spread: 0%
- Size: 30px
- Quality: USE DEFAULT VALUES
The result should be similar to the image below:
How to Create a Magic-Yielding Sorceress Photo Manipulation - Page 5
Page 5 of 6
Next, let’s create another layer (Ctrl/Cmd + Shift + N) and then type “Magic 5” as its name. Before you proceed, make sure to reset the brushes and then activate the Color Picker tool and input the following:
For the brush settings, input the following:
- Brush size: 20-60px
- Hardness: 0%
- Opacity: 100%
- Flow: 100%
See image below for more instructions:
Now, for the last procedure on this step, let’s add a very strong and bright light. First, let’s create a new layer and then name it “Magic 6”. We will be using the same brush color that we used for “Magic 5”. Activate the Brush tool (B) and then input the following:
- Brush size: 900px
- Hardness: 0%
- Opacity: 100%
- Flow: 100%
Paint on the region shown below:
Now, the image should be similar to this image:
After that, select all the layers that we’ve create in this step and then press Ctrl/Cmd + G to group them. Name this group: “Magical Light”.
Step 6: Add the glow on the sorceress
In this step, we’re going to add the glow on the sorceress’s face produced by the Magical Light on her hand. To start, let us first create a new layer (Ctrl/Cmd + Shift + N) over all the layers that we’ve created. When the new layer box is open, name it to “Glow 1”.
Now that this new layer is created, let us set up the brush color that we’re going to use. Activate the Color Picker by clicking on the Foreground box. When it opens, input the following:
Take note that this will be the brush’s color for this whole step. Activate the Brush tool (B) and use the following settings:
- Brush size: 500px
- Hardness: 0%
- Opacity: 25%
- Flow: 100%
We’re first going to light up the eyes of the sorceress. Before you proceed, it is recommended that you zoom in to your image. The recommended value is 400%. You can set this up by pressing Ctrl/Cmd + (+) or by manually inputting the desired value on the Navigator window.
See image below:
Now that the image is zoomed in, you can now accurately paint. For more instructions, refer to the image below:
Once you’re done with that, let’s now proceed to the other eye.
The result when viewed at 25%:
Create another layer; after creation name it “Glow 2”. Activate the Brush tool (B) and input the following:
- Brush size: 500px
- Hardness: 0%
- Opacity: 25%
- Flow: 100%
The result of that should be similar to the image shown below:
Create a new layer and then name it “Glow 3”. Activate the Brush tool (B) and use the following settings:
- Brush size: 500px
- Hardness: 0%
- Opacity: 15%
- Flow: 100%
Refer to the image below for more instructions:
How to Create a Magic-Yielding Sorceress Photo Manipulation - Page 6
Page 6 of 6
Next, create another layer and name it “Glow 4”. Activate the Brush tool (B) and then input the following:
- Brush size: 500px
- Hardness: 0%
- Opacity: 15%
- Flow: 100%
For the final layer, we will be making the pendant on her necklace glow. Name this layer: “Glow 5”. Have your Brush tool (B) ready and then input the following settings:
- Brush size: 10px
- Hardness: 0%
- Opacity: 100%
- Flow: 100%
Before you proceed, it would be recommended to zoom at a level of 400% to be accurate. Use your brush on the region shown on the image below:
When you’re done, right click on the “Glow 5” layer and click on Blending Options. Once that is up, click on the Outer Glow tick box and click again on the Outer Glow word to bring up its menu. When the menu is up, input the following:
- Structure: USE DEFAULT VALUES
- Elements
- Technique: Softer
- Spread: 0%
- Size: 54px
- Quality: USE DEFAULT VALUES
The result as seen from a zoom level of 25%:
When you’re done, group these layers and name the group: “Glow on sorceress”
Step 7: Create a Vignette
In this step, we will learn how to create a vignette which will help enhance the focus on our subject. To start, go to the Menu bar and click on File > New and use the same settings we used to create our canvas. (Refer to Step 1). Take note, the background contents should be: WHITE Once it has been created, go to Filter > Distort > Lens Correction. Find the tab Vignette and use these settings:
- Vignette amount: -100
- Midpoint: +50
Now that that’s done drag the vignette to our canvas using the Move tool (V) and put it on top of all the layers that we’ve created, and then set the following:
- Blending mode: Multiply
- Opacity to 100%
To set the blending mode, simply click on the drop-down menu beside the word “Normal” on the top part of the Layer window. The Opacity is located just beside that drop-down menu as well. See image below:
The unblended Vignette will look like this:
Once the blending mode is set to “Multiply” it would look like this:
Step 8: Retouch the image
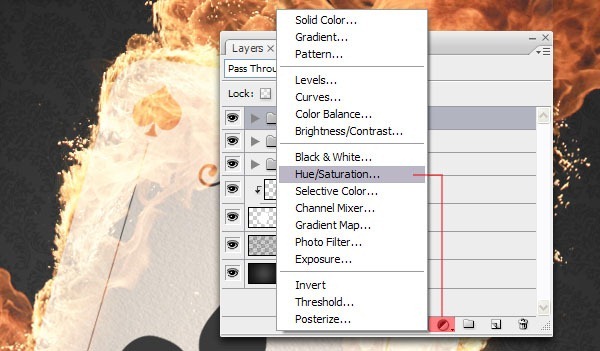
In this step, we will be enhancing the feel and look of the image by retouching it. First, let’s start off by creating a Solid Color adjustment layer. To do that, click on the “Create New Fill/Adjustment layer” button located on the Layer window. See image below:
Once the Solid Color box opens, it would show the Color Picker box. Input the following on the “#” box.
When you’re done, set the following:
- Blending mode: Exclusion
- Opacity: 40%
“INSERT step8b_solid_color_1.jpg”
Next, let’s create another Solid Color adjustment layer. This time, input the following color code:
When done, input the following:
- Blending mode: Soft Light
- Opacity: 40%
The image should now be similar to this:
Next, create another Solid Color adjustment layer, and input the following color code:
Set the following:
- Blending mode: Soft Light
- Opacity: 10%
The image should be looking much warmer after applying that adjustment layer. Next, create a Photo Filter adjustment layer.
When the Photo Filter box opens, input the following:
- Filter: Warming Filter (81)
- Density: 25%
- Preserve Luminosity: Check
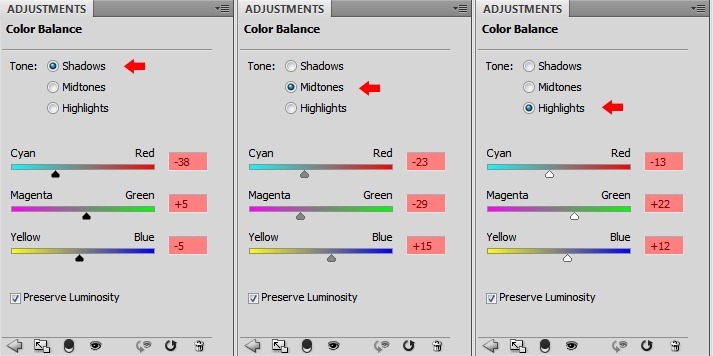
After that, create a Color Balance adjustment layer.
Input the following values:
- Color Levels: 0, -5, -5
- Tone Balance: Midtones
- Preserve Luminosity: Check
The image should now be similar to this:
Step 9: Give the image a radiant glow
Now, we will give the image a luminous effect to compliment the glowing orbs the sorceress is creating. To do that we will need to compress all layers or simply, flatten the image. To flatten the image, right click on any layer and then choose Flatten from the contextual menu.
Once it is flat, duplicate it (Ctrl/Cmd + J); click on the duplicated layer and then go to Filter > Blur > Gaussian Blur. Input the following:
After that, you’d see that your image is really blurry; so to make it glowing, change the Blending mode of the blurred (duplicated layer) to Lighten and set its opacity to 35%. The result should be like this.


![pc_final[1] pc_final[1]](http://photoshoptutorials.ws/images/stories/c485331dd07d_10673/pc_final1.jpg)
